 Full-featured charting is available in both the stand-alone Chart tool accessed through the Launch Tools menu and in the Symbol Hub.
Charts provide a quick way to absorb data and understand a security's performance. They provide vast amounts of data in an efficient, user-friendly, customizable format, making it easy to analyze price and volume movements in real time.
Full-featured charting is available in both the stand-alone Chart tool accessed through the Launch Tools menu and in the Symbol Hub.
StreetSmart Edge® has advanced charting features that give you the freedom to customize your charting experience to your precise specifications. Features available include more than 30 customizable studies; the ability to draw trend, support, and resistance lines and symbol overlays; chart types, including mountain, bar, line, and candlestick; and much more.
You may display up to 20 charts across with up to 20 tabs in each. You can also save up to 20 tabs to the software (but save as many as you wish to a local hard drive using the Save as File feature).
 For a demonstration and more information on using Charts, visit the Training page.
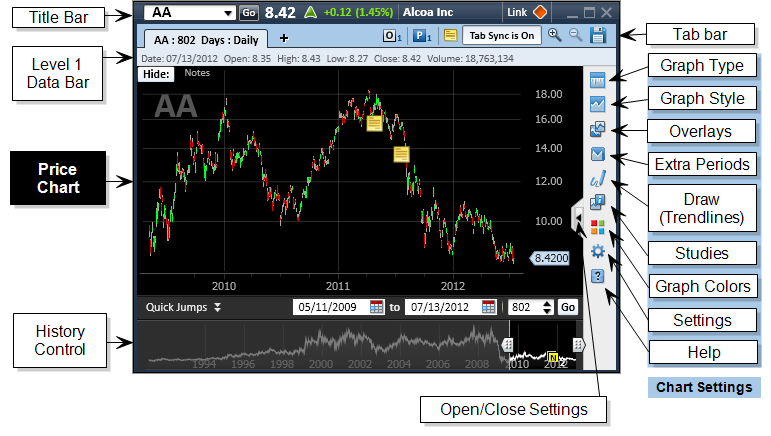
Each important area of the Chart tool is displayed in the image below.
Stock symbols and price and volume data shown here and in the software are for illustrative purposes only. Charles Schwab & Co., Inc., its parent or affiliates, and/or its employees and/or directors may have positions in securities referenced herein, and may, as principal or agent, buy from or sell to clients.
TIP: For more information on getting the most out of your chart display, see Chart Display Tips.
The following table explains each major element of the Chart display:
| Chart Features | |
|---|---|
| Price Chart |
The heart of the Chart window is the price chart itself. It displays the main symbol's chart with your Type and Style specifications (see Chart Settings).
Across the top of the chart are Chart Keys which represent the symbol overlays, studies, or drawn objects you have added to the chart from the Chart Settings panel. To Hide/Show ALL overlays, drawn objects, and studies, click Hide in the upper left corner of the chart. Click Show to display them again. For more on overlays, drawn objects, and studies, see Chart Settings. Study Panes Studies and overlays can display in a separate pane below the price chart if you wish.
TIP: You can move study panes around the chart. While pressing CTRL on your keyboard, click on the study pane. Drag the pane up or down, either to place it above the price chart, or if you have multiple panes, to place it above or below other panes. Release the mouse when the pane is positioned where you want it. Order, Position, and Note Indicators: The chart can display Order |
| Title Bar |
Enter the symbol you want to view a chart for and click Go or press Enter. The Title Bar is available in several tools, and includes some basic price data as well as the Tool Link Icon. For more on these features see Title Bar. You can also Duplicate an entire Chart window by right-clicking in the title bar and selecting Duplicate Chart Window. |
| Tab Bar |
Shows the tabs open in this Chart tool.
|
| Level I Data Bar |
Shows the Date/Time, Open, High, Low, Close, and Volume for the point your mouse is aligned with. You can also do this by holding down the Alt key as you hover your mouse pointer over points within the chart. If your mouse is not over the chart area, the data bar displays the last (most recent) value for those fields. TIP: You can turn off the Level I Data bar via the Chart Settings panel. Under Settings, uncheck Show Level I Data Bar. |
| Chart Settings |
The chart settings panel is accessible by either clicking one of the icons or by clicking the arrow Set the type and style of chart, add overlays, draw trend lines and other objects, change the colors, and more from the Settings panel. For detailed information on each feature in the Settings panel, visit Chart Settings. |
| History Control |
The bottom panel under the chart shows the full range of historic chart data for the Type of chart you've selected. There are several ways to specify which portion of that data you want to display:
TIP: You can hide the History Control via the Chart Settings panel. Under Settings, uncheck Show History Control. The Year Spans, Date Selection, and Number of Days remain visible. |
 , Bracket
  , and Position
  indicators, as well as any Notes
  related to the symbol being viewed. For more on these features, see
  and then click and drag across a portion of the chart to zoom in on that portion. You can achieve a similar result using the History Control feature described below.
  to save the active chart. You can also right-click on a tab to select a save option. You have a choice of saving your chart as a Template or as a File.
  to open the "drawer" and view all the settings choices.
 and right
  slider handles, which you can drag to the date or time to which you want to isolate the chart data shown.
